Donwload MMD Terbaru dan Keren Support 4G / LTE

Bagi pecinta gretongan pasti sudah sangat kenal dengan yang namanya MMD karena disamping lebih mudah setingannya juga MMD lebih ringan dijalankan daripada modem bawaannya. Sejak munculnya bahasa gretongan maka MMD muncul sebagai salah satu alat tempur yang ampuh, disamping juga harus disandingkan dengan bitvise dan proxifer, juga bisa disandingkan dengan simple server dan psiphon.

Begitu banyaknya pengguna MMD ini dari awal muncul gretongan, MMD juga mengalami perkembangan yang awalnya masih terbatas sinyal 2G dan 3G, sekarang dengan adanya sinyal yang berupa 4G, maka MMD juga tidak ketinggal memanjakan penggunanya dengan menambahkan juga fitur seting sinyal 4G.

Berikut ini salah satu aplikasi MMD yang menurut kami sangat menarik, disamping ringan untuk dijalankan, fiturnya juga lengkap diantaranya :
Fitur HOME
- Tertera namamodem yang dipakai
- Tertera Tanggal saat itu juga
- Terdapat speed
- da lain sebagainya

Fitur DIAL
- Use Default Gateway
- IP header Compression
- Disable NetBIOS
- Use Manual DN
- Auto Route
- Reconnect Base On
- Reconnect Offline
- Loncat Kodok (perpindahan sinyal secara otomatis)
- Setingan Sinyal (Automatic, Edge Only, Edge Preferred, 3G Only, 3G Preferred, LTE Only, LTE Preferred)
- IP Hunter
- Start dan Stop

Fitur USD SMS

Fitur Routing (CMD)

Fitur HTTP (Ping)

Fitur EXTRA

Itulah beberapa fitur yang terdapat dalam MMD ini, bagi yang ingin memilikinya buat koleksi bisa di donwload pada link berikut secara cuma-cuma

Donwload MMD Keren Support 4G / LTE

Demikian postingan terkait Donwload MMD Keren Support 4G / LTE ini semoga bermanfaat dan terima kasih

Ineck XL Youtube 100% Oktober - Nopember 2017

Hallo para pencinta internet PC Gratisan, masih bingung ya mau gimana lagi biar bisa interneta gratisa di PC karena semua operator seluler pada ngambek. Banyak orang yang iri pada kita karena kita bisa menikmati internet gratisan.

Nah ini saya coba share injek XL Youtube dengah tampilan yang sangat sederhana namu yang peling penting bisa konek dan bisa menikmati gratisan lagi. Injek ini saya dapatkan dari group facebook dan sudah saya tes ternyata work 100% silahkan anda coba semoga anda beruntung juga. Injek ini sangat praktis tidak usah menginstal bitvise dan proxifer, langsung gas dan tunggu beberapa saat bisa langsung konek. Lihat penampilannya, injek ini merupakan karya dari seorang yang ahli dalam pembuatan injektor bernama  

Silahkan donwload injek XL Youtube 100% Oktober - Nopember 2017 click here
Sekalian Config XL Youtubnya click here

Cara penggunaannya sebagai berikut
Buka injeknya yang didonwload tadi
Klik Import dan klik Config tadi yang di donwload
Di Pengaturan silahkan isi akun ssh anda
kembali ke injektor klik Star dan login
Gunakan Port 443

Sekian potingan Ineck XL Youtube 100% Oktober - Nopember 2017 semoga tanvan dan cakep.
Kalau ada msalah silahkan tinggalkan komen anda.

Donwload MMD support 4G atau LTE Okotber 2017

Donwload MMD support 4G atau LTE Okotber 2017

Setelah muncul sinyal 3G, HSDPA, HSDPA+ kini muncul sinyal yang lebih canggih yang biasa disebut 4G atau LTE, hebatnya lagi setiap operator seluler berlomba-lomba memanjakan nasabahnya dengan memberikan kuota yang besar dengan harga sangat murah di jaringan 4G.

Di PC untuk menggunakan internet tentunya lebih mudah menggunakan aplikasi yang di sebut MMD buat koneksi internet, nah untuk kali ini saya share MMD yang sudah dilengkapi dengan jaringan 4G atau LTE. Silahkan di ambil di link berikut ini

Donwload MMD support 4G atau LTE Okotber 2017 click here

Semoga bermanfaat


Tutorial Menggunakan Aplikasi Psiphon Di Android

Tutorial Menggunakan Aplikasi Psiphon Di Android

Psiphon Pro adalah salah satu tools aplikasi internet gratis yang digunakan untuk mendapatkan akses internet tanpa menggunakan kuota data, diantara aplikasi lainnya psiphon lebih banyak digunakan oleh para phreaker. Phreaker sendiri telah lama menggunakan aplikasi ini sebagai senjata andalan untuk menjelajah dunia online tanpa kuota, kelebihan aplikasi ini dilengkapi dengan vpn yang berfungsi untuk membuka akses situs yang diblokir oleh pemerintah. Jadi bila diantara teman – teman penasaran untuk menggunakan aplikasi psiphon ini, kami akan membantu anda untuk memandu anda di dalam artikel kami cara menggunakan aplikasi psiphon tanpa root di android.

Cara Menggunakan Aplikasi Psiphon Tanpa Root Di Android

  1. Sebelum anda mengikuti tutorial ini, pastikan anda tidak memiliki pulsa sama sekali Rp.0
  2. Selanjutnya download aplikasi psiphon for android yang kami sediakan disini atau disini saja.
  3. Setelah anda selesai mendownload aplikasi pshophon tersebut teman – teman bisa menginstalnya di smartphone android anda.
  4. Saya rasa anda telah paham bagaimana cara untuk menginstal aplikasi psiphon tersebut.
  5. Bukalah aplikasi psipn yang akan muncul 2 pilihan kategori, kategori pertama “Use Psiphon Browser Only” artinya anda menggunakan aplikasi psiphon untuk internet gratis untuk digunakan pada browser, untuk ketegori yang kedua “Tunnel Whole Device” yang berarti bahwa anda menggunakan aplikasi tersebut pada semua aplikasi yang terhubung pada jaringan internet.
  6. Pilih saja Tunnel Whole Device.
  7. Selanjutnya aplikasi psiphon akan memberikan notifikasi peringatan untuk izin akses “Saya mempercayai” aplikasi ini. Kemudian pilih Oke.
  8. Kemudian anda akan melihat Log berlambang icon P, tunggulah sampai lambang tersebut berubah warna menjadi biru yang artinya aplikasi psiphon telah terhubung dengan server.
  9. internet gratis psiphon terbaru 2017
  10. Jika telah terhubung anda tinggal meminimize aplikasi tersebut dan sekarang anda tinggal menikmati akses internet gratis tanpa kuota tanpa batas.
  11. aplikasi internet gratis psiphondi hp android
  12. Untuk menghentikan aplikasi tersebut anda tinggal menekan tombol Stop atau pilih Putuskan Sambungan.
  13. cara menggunakan psiphon tanpa root
  14. Selesai.

Nah untuk teman – teman yang ingin mendapatkan akses internet tanpa kuota yang digunakan di hp android anda bisa mengandalkan aplikasi psiphon sebagai senjata andalan anda, tools aplikasi internet gratis ini dapat anda gunakan tanpa akses root sehingga teman – teman lebih mudah dalam menggunakannya, untuk konfigurasi lainnya berupa bug anda bisa mendapatkan pada sebuah forum – forum diskusi yang menggunakan aplikasi psiphon.

Injek Tri Bangkit Oktober 2017 Work 100%

Injek saya dapatkan dari website www.mbahhanif.site dan sudah terbukti work, bagi anda yang ingin mencicipi silahkan ambil  injek ini dan mudah-mudah work di TKP agan dan termasuk tanvan juga :D
Injek ini dlengkapi dengan vitur

  1. Server 3 bug dan dibagi dengan Http/1.0 dan Http/1.1
  2. Tombol start dan stop
  3. port 8080, 80, 312 dan lainnya
  4. Anti sniff
  5. APN bebas
  6. Tanpa IP sakti
  7. dan masih banyak lagi lainnya

  8. Fast konek
  9. no skin
  10. LP 1234
  11. Anti DC

Silahkan ambil pada link berikut :

Semoga bermanfaat dan beruntung ya, selamat menikmati internet gratisnya


Tutorial Internet Gratis dengan Kartu Telkomsel Polosan di PC 2017

Maraknya gretongan atau yang biasa disebut dengan internet gratis membuat banyak orang mencarinya triknya dan memodifikasinya sendiri sehingga bisa menikmati internet gratis di androit ataupun internet gratis di PC / laptop dan itu bukanlah sebuah mitos karena memang benar-benar gratis dan hebatnya lagi unlimit.

Setelah saya berselncar di dunia maya dan berusah juga mencari trik merebut internet gratis akhirnya bisa juga menikmati dengan menggunakan tutorial dari http://www.siddiqrn.net. Dan karena saya berhasil menggunakannya maka saya juga akan share sedikit pengalaman ini dangan digabungkan langkah-langkah untuk koneksi internet gratis dari web http://www.siddiqrn.net

Bagi yang kepingin juga silahkan ikuti langkah-langkah berikut ini

Baha-bahan yang perlu dipersiapkan adalah :

  • SC Telkomsel (AS, Simpati, Loop) nol pulsa dan nol kuota
  • Modem
  • Proxifier
  • Simple Server
  • Psiphon PC

Untuk mempermudah, Anda bisa mendownload bahan - bahan tersebut dibawah ini :


Selanjutnya silahkan ikuti langkah - langkah dibawah ini

Pertama
Buka MMD dan setting APN menjadi manisbrn4 atau manistbs5. Untuk TKP Saya (Tasikmalaya), apn manisbrn4 tidak bisa digunakan (tidak mau konek) jadi Saya gunakan manistbs5. Namun silahkan Anda sesuaikan dengan TKP kalian.

Jangan lupa centang dagu (default gateway). Setelah semuanya beres, silahkan Konekkan modem.

UPDATE 30 September 2017 : Jika dengan APN manisbrn4 dan manistbs5 tidak bisa konek, bisa gunakan APN internet, aha, telkomsel

Kedua
Selanjutnya buka folder Simple Server yang telah di download tadi, disana ada dua file, yang pertama SimpleServer.exe dan file konfigurasi. Silahkan Anda jalankan SimpleServer.exe dan jangan buang atau rubah file konfigurasinya. Karena file tersebut sudah di setting untuk trik ini. buka dan diamkan simple server sampai seperti gambar dibawah ini
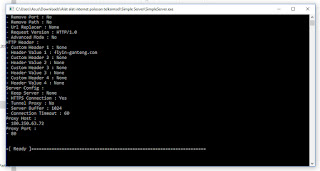
Trik Internet Gratis Telkomsel di PC

Ketiga
Install Proxifier dan masukkan key yang ada pad folder hasil downloadan tadi. Jika sudah terinstall, silahkan Buka Proxifier lalu masuk ke Proxy Servers dan pilih Add. Isi Address dengan 127.0.0.1 dan Port dengan 8089 lalu pilih HTTPS dan OK (lihat gambar dibawah ini).

Trik Internet Gratis Telkomsel di PC

Keempat
Jika semua sudah selesai disetting, selanjutnya buka browser Anda (recomended Google Chrome). Disini kita cek ada tidak nya koneksi, untuk mengetahuinya masuk ke telkomsel.vuclip.com atau operamini.net jika salah satu dari web tersebut terbuka berarti besar kemungkinan akan work.

Namun apabila masih belum terbuka, silahkan Anda konek - diskonek modem hingga nemu

Kelima
Buka Psiphon lalu Hubungkan. Psiphon ini berguna sebagai penghubung HTTP dan HTTPS. Jadi jika tidak menggunakan Psiphon trik ini akan jalan jika Anda mengakses situs dengan HTTP. Namun bila Anda membuka Google tidak akan bisa karena menggunakan HTTPS. Oleh karena itu, kita harus menggunakan Psiphon.

Bagi yang tidak konek atau susah konek mungkin bisa mencoba dengan mengganti Proxy yang ada di dalam file konfigurasi Simple Servernya dengan cara :

1. Download Proxy
2. Buka folder Simple Server
3. Masuk ke file konfigurasi Simple Server (lihat gambar dibawah ini)

4. Ganti Proxy yang ada di PHOST dengan proxy yang cocok di tkp Anda


Kalau masih belum konek juga silahkan langsung buka Psiphon dan sambungkan atau koneksikan tanpa harus menggunakan proxifer

Trik ini saya dapatkan dari website http://www.siddiqrn.net dan sudah Saya coba dan 100% work. Meskipun agak susah untuk mencari IP yang cocok, untuk speed silahkan Anda coba sendiri.
How To Reinstall Flashing Infinix. Hot Note X551

How To Reinstall Flashing Infinix. Hot Note X551

Infinix Hot Note X551 is a pretty popular HP this year, this android phone spec his belongs to pretty good so that an awful lot of devotees. But there are some things you need to consider when you hobby modifying the Android System, most likely happened is the main solution Bootloop, so is doing a restart or reinstall the Flash with the help of a PC or Laptop.

What you guys need to do Flashing?
How To Troubleshoot Hp Android Bootloop
Overcoming Infinix Hot Hot X551 Lemot Quick Note
Download ROM Infinix Hot Note X551 Nuggets marswalow

Please prepare your material-material that is:

1. ROM for Infinix Smartphone
2. SP Flashtool | here
3. Driver MTK | here

After preparing the above materials please we continue about the steps
Flashing, before you go any further it will be good you noticed our experience when installing HP Infinix Hot Note X551.

1. Our experience using Windows 7
2. Select the option Firmware updated so that the IMEI is not lost.
3. Determination and not hurry up.

Next is the step-step how to Reinstall Flashing Infinix Hot Note X551 using MTK Flashtool SP Software and drivers. is as follows:

  • Please Extract the ROM from Infinix Smartphone X Fans ...
  • Please install the drivers on the computer when MTK X Fans does not detect the Driver from Infinix Smartphone you guys ...
  • Next please open Flashtool SP application ...

  • Please X Fans go into the menu Options-Download-check the USB part of the Checksum ...

  • Click the Scatter Loading on Flashtool SP. ..

  • Please X Fans looking for files in the Folder Loading Scatter ROM that has you guys Extract previously and click Open ...

  • After that the Checksum process will take place and wait until the process is complete ...

  • next please you guys change the Download option Only be Firmware Updates then please press Download ...

  • Please connect the Infinix Smartphone X Fans to your computer or Laptop in case Off a USB cable while pressing the Volume Up (+) ...

  • Flashing Process takes place between 10-15 minutes ... When the process has finished Flashing then it will Pop Up a tick appears in green ...

  • Process Flashing finished ... Please turn on the Infinix Smartphone X Fans manually ...


That's what tips do how to Reinstall Flashing Infinix. Hot Note X551, SP, MTK Flashtool Drivers. may be useful and could be useful when experiencing confusion please commented on the comment link below. Thank You,

How To Remove Epson Printer L310 Status Monitoring

How to remove Epson L310 Printer Status Monitoring is actually quite easy. But for those who are confused wear Epson L310  printer to eliminate status monitoring that often appear when doing print, I'll give you the easy way to remove Epson printer status monitoring. Before you make changes to the settings of the printer there should know about usability why Epson printer always bring up the status of the monitoring time of print. Usability status monitoring print is actually quite helpful because it can check the remaining amount of ink the printer that was used, but if you schedule regular ink of course you don't have to worry about printer ink will run out. Besides the actual usefulness of the printer status monitoring, sometimes it's also quite annoying because each job the printer always appear the status monitoring so that blocking applications that are on the used to do. If you do the workers who need a lot of speed we recommend monitoring the status of the printer at the right hip. Then how do I remove it?.

How To Remove Epson Printer L310 Status Monitoring .

To remove a status monitoring Epson L310 printer it's easy, follow my instructions below
Select start windows >Select Devices and printers > Select Epson L310  Printer  the status ready  right click select Printing Preferences Select 
On page printing preferences choose maintenance or Maintenance Tab then choose additional settings. See the picture below
In the additional settings unchecked turn on EPSON Status Monitoring. Select Apply and OK see picture below

Pemeliharaan atau Maintenance
Setting the settings now you have foxes, is now trying to do a test printer, EPSON status Whether monitoring still appears or not. If no longer appear when you print it means the setting is correct. If you want to restore the default settings for EPSON status monitoring click checkbox EPSON Status Monitoring.
Aktifkan EPSON Status Monitoring
That's how to remove Epson L310  printer status monitoring, hopefully a summary I created above to help you.

Free Download Driver Epson L310
Windows Xp, Vista, Win 7, 8,10 32 Bit

Windows Xp, Vista, Win 7, 8,10 64 Bit

How to Download and install WhatsApp Application in Android Tablet

This tutorial is a continuation of my previous blog i.e. Android Indonesia. Problems that frequently complaining by the blog readers are at the time of application install WhatsApp from the links I've provided most complained about a problem that is requested in setting time setting. In short the application WhatsApp can not be used.

From here it can be concluded that the application of WhatsApp to old versions can not be used again even though the application I get on the official site of WhatsApp. Indeed, the application that is in the blog the old version or the year 2015 and indeed I have not had time to update. In order to make it easier for users of Android Tablet that can not download application WhatsApp I will give you the latest tutorial so that blog readers no longer need to contact me to request the latest version of WhatsApp application or update.

WhatsApp application to date is not available for some types of Android tablet. Not all there are several types of Android tablet that can already use WhatsApp with install directly from the Play Store. As I explained before I get this application is indeed from the official website i.e. www.whatsapp.com, but the problem is if the user's Android Tablet especially if you want to download by visiting the official site will be on point to Play Store and the problem will always arise notice "of your device is not compatible with this version of".

There are a few easy tricks to be able to download the application directly on the tablet does WhatsApp through Play Store and also to update the latest version of WhatsApp application. The application also which I gave on the Android blog Indonesia. Please refer to the full explanation here.

The first step.
Open Chrome apps on Android Tablet. Please do the setting in advance by pressing point three at the top right corner. Please press on the menu Change Desktop site to enable a check list.

The second step.
Go to the site www.whatsapp.com, if it pleases select the DOWNLOAD or download continue by pressing menu Android. Next door there are iPhone and Android Windows Phone meaning if there is a second type of mobile phone users will not be able to download the official version of WhatsApp application store official then can use this way.


The third step.
Please press menu Download Now. WhatsApp application that is on this website is the latest version. The file size will vary for each individual. Like in the picture below there is information i.e. Tablet devices are not supported. That means it's not support if the Play directly from the Store but if from the official site can still be installed on Android Tablet.

Sign applications already in the download there will be arrows on the top right corner of screen Android tablet. Please wait until the download process is complete.

If you want to update to the latest version is usually there will be a notice on the application of automatic WhatsApp but if does not appear then to update to the latest version WhatsApp application please do as in the above stages. If there are any questions please tell us in the comments field, good luck.
How to put ads in the margins of the right and left edge blog

How to put ads in the margins of the right and left edge blog

Have already known about making ads hovers on the edge of the blog? The purpose of advertisement hovered on the edge of the right and left of the blog of course larger to get the profit for us who has been the publisher of a company. It was a good Publisher can place ads properly so that the visitors can enjoy and feel interested in what we advertise.

Well, for those of you who do not know and would like to place an ad in the right and left margins of the blog please follow this guide.
  1. Please click on blogger.com and login match your account
  2. Please go dashboard and click toward the next click Layout
  3. Third-click add a gadget Furthermore copy paste below script and please put it anywhere
  4. Please change the words "LAYOUT of the AD SCRIPT here" by with the ads you
  5. Furthermore Please save layout and finishes
  6. That last one please seen the results ...
<!-- floating ads idebangga.blogspot.com -->
<script type='text/javascript'>
$(document).ready(function() {
$('img#closed').click(function(){
$('#btm_banner').hide(90);
});
});
</script>

<script type="text/javascript">var a=navigator,b="userAgent",c="indexOf",f="&m=1",g="(^|&)m=",h="?",i="?m=1";function j(){var d=window.location.href,e=d.split(h);switch(e.length){case 1:return d+i;case 2:return 0<=e[1].search(g)?null:d+f;default:return null}}if(-1!=a[b][c]("Mobile")&&-1!=a[b][c]("WebKit")&&-1==a[b][c]("iPad")||-1!=a[b][c]("Opera Mini")||-1!=a[b][c]("IEMobile")){var k=j();k&&window.location.replace(k)};
</script><script type="text/javascript">
if (window.jstiming) window.jstiming.load.tick('headEnd');
</script>

<!--start: floating ads idebangga.blogspot.com-->
<div id="teaser2" style="width:autopx; height:autopx; text-align:left; display:scroll;position:fixed; bottom:0px;left:0px;">

<div>
<a href="#" id="close-teaser" onclick="document.getElementById('teaser2').style.display = 'none';" style="cursor:pointer;"><center>
<img src='https://blogger.googleusercontent.com/img/b/R29vZ2xl/AVvXsEj4_iuZXOcDJWSG2rmW2C3W-ld56eiOdPNWW-p07LLJReQsLJyx3DthwHT-lwZoU5nedCVn-hDGxE-X2VG-STuOR8oHOpWXDau3ZqOEm3oRJffCtPp3yoVZUUQNjXYqMbVYIQQN8rpVBm17/s1600/PhoXo2.png'/></center>
</a></div>
<!--Mulai Iklan Kiri-->

LAYOUT of the AD SCRIPT here

<!--Akhir Iklan Kiri-->
</div>
<!--end: floating ads idebangga.blogspot.com-->

<!--start: floating ads idebangga.blogspot.com-->
<div id="teaser3" style="width:autopx; height:autopx; text-align:right; display:scroll;position:fixed; bottom:0px;right:0px;">

<div>
<a href="#" id="close-teaser" onclick="document.getElementById('teaser3').style.display = 'none';" style="cursor:pointer;"><center>
<img src='https://blogger.googleusercontent.com/img/b/R29vZ2xl/AVvXsEj4_iuZXOcDJWSG2rmW2C3W-ld56eiOdPNWW-p07LLJReQsLJyx3DthwHT-lwZoU5nedCVn-hDGxE-X2VG-STuOR8oHOpWXDau3ZqOEm3oRJffCtPp3yoVZUUQNjXYqMbVYIQQN8rpVBm17/s1600/PhoXo2.png'/></center>
</a></div>
<!--Mulai Iklan Kanan-->

LAYOUT of the AD SCRIPT here

<!--Akhir Iklan Kanan-->

</div>
<!--end: floating ads idebangga.blogspot.com-->
<!-- end: floating ads idebangga.blogspot.com -->

So this tutorial about advertising hovering right edge and the edge of this blog may be useful and thank you for visiting our blog is very simple.

If there are questions and poorly understood please leave a comment below, it's easy-easy us biased answer. Thank you